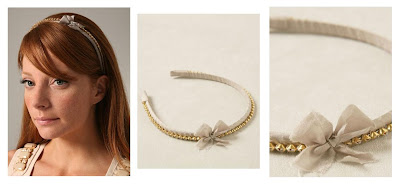
The Inspiration:


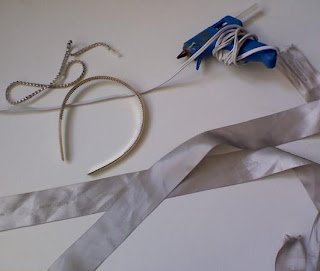
Materials
1. Hot Glue Gun
2. 1 Yard of ribbon
3. A string of rhinestones (1 1/2 feet long)
4. A headband
5. Clear nail polish not pictured
6. Scissors not pictured
7. Sharpie not pictured
The ribbon I'm using is actually the ribbon Nordstrom ties around their gift boxes, but you can buy ribbon for $3 at any art supplies stores. The string of rhinestones is available at Michael's for around $5 a foot, and I promise I did actually have this lying around the house. If you don't have a spare headband, Target has some nice ones for only $2 or you can even try the dollar store.

Since the ribbon I used was too thick, I cut it in half. However, if you go out and buy some I suggest getting a width of 1/2 inch. Whenever you cut the ribbon it can fringe, to avoid this problem, 'paint' along the edge with the clear finger nail polish.
Now, mark with the sharpie where you want the bow to be. You'll see why in a second.
 Okay, so now you've marked where you're bow is going to be. On one side of the mark, take the ribbon and hot glue the edge of it on the backside of the headband. Then, proceed to wrap around until you reach the end of the headband. When you get to this point, then hot glue the edge off on the inside. You don't want any seams to show.
 You are going to do the same on the other side of the marking as well, but leave a gap of 1/2 inch.
 Now, that you have the headband wrapped, it's time to apply the rhinestones. Start at one end, just get about 1/4 an inch to the very end. You don't need or want it to go all the way down. Hot glue the rhinestones and then proceed until you reach the other end. It's important to make sure you hot glue each rhinestone,if you don't it will not lay completely flat. Since its on a string, all you have to do is make a line with the hot glue and then push the rhinestones in until secure, do an inch at a time.
  Okay, now its time to fill that gap that we left earlier. With the extra ribbon, you are going to tie a bow around the headband. But instead of tieing a bow and then attaching it to our headband, we are actually going to tie it around the headband. Before pulling the knot, put a dot of hot glue down so it will stay secure, then tye a bow
  Now, you are almost done but the ends of the headbands are still unfinished. To make everything look neat simply glue a piece of ribbon like so.
Yay! You're done!
Here's what the final product looks like:

The picture, really doesn't do it justice and I'm really pleased with the result.


4 comments:
That headband turned out GORGEOUS,
much better than spending $62 right?
The headband is gorgeous and even the pictures of you making it some how seem chic. Nice job!
I like it way better than the original
I just made this headband the other day and it turned out awsome. I'm wearing it to thanksgiving dinner :). I couldn't find rhinestones that were on a string so I was stuck gluing each one individually which sucked but only took me about 45 minutues over all. Thanks for the great idea!
Post a Comment